Accessing Weblogic 12c’s Runtime Properties Using JMX

In an use case I was working, I needed to access the Weblogic 12c runtime properties.
I searched for it in Oracle documentation, but I could not find a complete example, so I decided to create this blog post and a github example.

In this example, I will show only how to make local connections to the Weblogic’s Domain Runtime MBean Server, because my use case only required that, but you can also make remote connections from Java applications not deployed in the Weblogic server.

After some research, I discovered how to get the parameters by name, and also how to get all the server parameters, if you don’t know the exact name of your parameter but you know the value that it should have.

Then I created a jsp page to display all those parameters.

First, let’s take a look at the WeblogicDataRetrieverServletContextListener class, it is a ServletContextListener, and this class executes its contextInitialized(ServletContextEvent servletContextEvent) method when the application starts, and it executes the contextDestroyed(ServletContextEvent servletContextEvent) method when the application is undeployed.

In the contextInitialized() method, I get all the weblogic parameters only once and store them in the application / servletcontext scope, so all the users have access to this information.

There are some parameters that cannot be displayed as clear-text because of the Weblogic’s security configurations:

The parameters are:

JavaStandardTrustKeyStorePassPhrase,
CustomIdentityKeyStorePassPhrase,
CustomTrustKeyStorePassPhrase,
DefaultIIOPPassword,
DefaultTGIOPPassword.

If we don’t filter them when retrieving the server properties, an exception will happen:

1

Image 1 – Application initialized with error when we don’t filter the runtime parameters.

com.ribas.andrei.servletlistener.WeblogicDataRetrieverServletContextListener failed: weblogic.management.NoAccessRuntimeException: Access to sensitive attribute in clear text is not allowed due to the setting of ClearTextCredentialAccessEnabled attribute in SecurityConfigurationMBean. Attr: JavaStandardTrustKeyStorePassPhrase, MBean name: com.bea:Name=AdminServer,Type=Server.
weblogic.management.NoAccessRuntimeException: Access to sensitive attribute in clear text is not allowed due to the setting of ClearTextCredentialAccessEnabled attribute in SecurityConfigurationMBean. Attr: JavaStandardTrustKeyStorePassPhrase, MBean name: com.bea:Name=AdminServer,Type=Server
at weblogic.management.mbeanservers.internal.SecurityInterceptor.checkGetSecurity(SecurityInterceptor.java:595)
at weblogic.management.mbeanservers.internal.SecurityInterceptor.getAttribute(SecurityInterceptor.java:298)
at weblogic.management.jmx.mbeanserver.WLSMBeanServer.getAttribute(WLSMBeanServer.java:279)
at com.ribas.andrei.servletlistener.WeblogicDataRetrieverServletContextListener.contextInitialized(WeblogicDataRetrieverServletContextListener.java:84)
at weblogic.servlet.internal.EventsManager$FireContextListenerAction.run(EventsManager.java:661)
Truncated. see log file for complete stacktrace

In the end of the article I will show how to enable the clear text credential access, to access the value of those those properties in clear text.

Connecting to the MBeanServer:

To get a JMX connection to Weblogic, we use JNDI to get a reference to the MBeanServer:

	InitialContext ctx = new InitialContext();

	MBeanServer server = (MBeanServer) ctx.lookup("java:comp/env/jmx/runtime");

Then we can already get some data from the server, like the default domain name and the list of domains in which any MBean is currently registered:

	String[] domains = mbeanServer.getDomains();

	String defaultDomain = mbeanServer.getDefaultDomain();

To get all the server runtime properties, first we need to get the server name in the system property:

	String serverName = System.getProperty("weblogic.Name");

Now we create an ObjectName with the server name, and retrieve all the attributes for the server:

	ObjectName objName = new ObjectName("com.bea:Name=" + serverName + ",Type=Server");

	MBeanAttributeInfo[] beanInfoAttributesArray = mbeanServer.getMBeanInfo(objName).getAttributes();

The next step is to iterate over that array and create a new object with the attributes name, description, value and type, and then add it to a collection:

	for (MBeanAttributeInfo info : beanInfoAttributesArray) {

		Object attributeValue = "not allowed to show";

		if (isAttributeAllowedToShow(info.getName())) {

			attributeValue = mbeanServer.getAttribute(objName, info.getName());

			if (attributeValue == null) {
				attributeValue = "";
			}

		}

		serverPropertiesInfoCollection.add(new ServerPropertiesInfo(info.getName(), info.getType(), attributeValue, info.getDescription()));

	}

Finally, we create a new object will all the data we got and store it in the ServletContext, so all users have access to the data:

	ServerProperties serverProperties = new ServerProperties(serverName, defaultDomain, domains, serverPropertiesInfoCollection);

	servletContextEvent.getServletContext().setAttribute("serverProperties", serverProperties);

In the created page, you can see that there are a lot of information.

At the top, you can see the server name, the default domain and all the server domains in which any MBean is currently registered:

7Image 2 – Initial server properties

Then in the next section, we iterate over all the server attributes collection exhibiting the name, type, value and description.
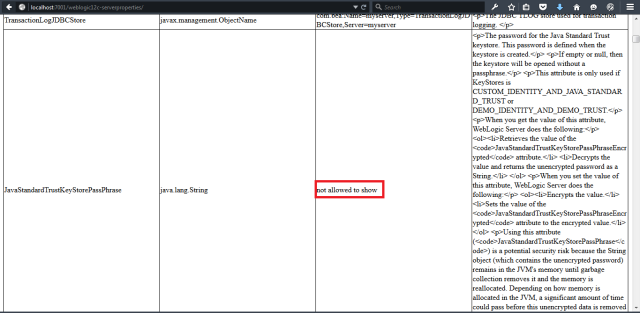
If the attribute’s value cannot be shown, like the “forbidden” attributes we mentioned in the beginning of the article, it’s value is set to “not allowed to show”.
If the value is null, we exhibit [null]:

8Image 3 – Attributes table.

In my use case, I needed only to get the ListenAddress and the ListenPort attribute values during runtime, but I did this nice example if anyone needs to access other properties.

To enable the Clear Text Credential Access:

In Weblogic console, click your domain:

2

Image 4 – Locating the domain

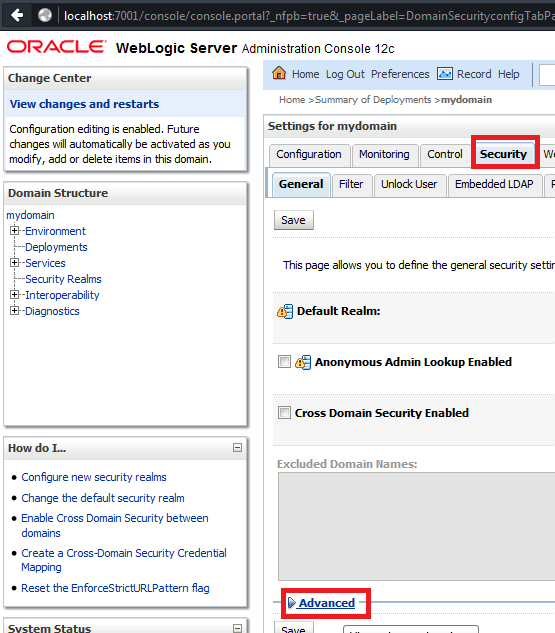
In the next page, click the Security Tab, then the Advanced link:

3

Image 5 – Locating the Advanced security settings

Then you will see the option Clear Text Credential Access Enabled, click it and then click the Save button, then the Activate Changes button.

4

Image 6 – Updating the “Clear Text Credential Access Enabled” property

If you edit my code and remove the not displayed property from the NOT_ALLOWED_ATTRIBUTES array, then they will be exhibited in Weblogic.
In my case, all those forbidden properties were blank / null.

Before:

5

Image 7 – Application deployed before changing the Clear Text Credential Access server security configuration, the secured data is not being displayed:

After:

6

Image 8 – Application deployed after changing the Clear Text Credential Access server security configuration and also changing the code to not filter the value of the password properties

Posted in Java EE, weblogic | Tagged , , | Leave a comment

Displaying an HTML Page inside a Vaadin 6 Application

In a recent use case I was working, I had to call a webservice that returned an html page and show it using Vaadin 6.

As this was not such a common Vaadin use case, I had to search a bit to get the full solution, and I decided to sahre it by writing this blog post and a github example.

Vaadin Documentation already has several different use cases, so it is nice always to check it. I did with the NativeWindow and SubWindow examples.

Basically, instead of calling the webservice, I will mock it in a StreamResource Vaadin API object, that it will contain the html page as a ByteArrayInputStream.
I will also create a fileName for it, and set the MimeType as text/html:

private StreamResource getStreamSource() {

	final String filename = "report-" + System.currentTimeMillis() + ".html";

	final StreamResource streamResource = new StreamResource(new StreamResource.StreamSource() {
		public InputStream getStream() {
			return new ByteArrayInputStream(("<html><body><h1>" + filename + "</h1></body></html>").getBytes());
		}
	}, filename, OpenWindowApplication.this);

	streamResource.setMIMEType("text/html");

	return streamResource;

}

In the example, I created three buttons, one for opening the html page in a new browser window, the other to open it as a Vaadin (Sub)Window and the third to create another (Sub)Window as modal.
Each button also has a Button.ClickListener anonymous inner class, to respond when the buttons are clicked to open the web page.

4
Image 1 – Application after the deployment

In the first ClickListener, when the click event occurs, I “call” the webservice by calling the getStreamSource() method, it will return the StreamResource.
I would like to open this new window in fullscreen, to show the page regardless of the size of the html, so I have a default resolution, and I also try to get the user’s screen resolution (of the browser window opened).
After that, I call the open() method in the Window class, passing the StreamResource object, the parameter to open in a new window (“_new”), and the size of the new Window.

new Button.ClickListener() {
	public void buttonClick(ClickEvent event) {

		final StreamResource streamSource = OpenWindowApplication.this.getStreamSource();

		ApplicationContext context = OpenWindowApplication.this.getContext();

		int width = 1024;

		int height = 768;

		if (context instanceof WebApplicationContext) {

			WebApplicationContext webApplicationContext = (com.vaadin.terminal.gwt.server.WebApplicationContext) context;

			width = webApplicationContext.getBrowser().getScreenWidth();

			height = webApplicationContext.getBrowser().getScreenHeight();

		}

		mainWindow.open(streamSource, "_new", width, height, Window.BORDER_NONE);

	}

}

2
Image 2 – New window opened after clicking the first button

I created some methods to create the subwindow to me, and I only pass some parameters like the title, and if I want it to be modal or not.
So in the second and third examples, the ClickListeners just create new Window objects, the first as non-modal and the second as modal:

Button modalSubwindowButton = new Button("Click here to open a modal subwindow showing HTML content.", new Button.ClickListener() {
	public void buttonClick(ClickEvent event) {
		createSubWindow("Modal subWindow with HTML content", true);
	}
});

The createSubWindow() method checks if there is a window opened, if it does it just displays a message, and if it’s not, then it gets the StreamResource again and then with it it creates an Embedded<https://vaadin.com/api/6.8.9/com/vaadin/ui/Embedded.html&gt; object of the type TYPE_BROWSER, setting 100% for its width and height, then adding it to the subwindow.
Then I create the subwindow, its size is 80% of the main window, and I center it also.
For those two examples, I also created a Window.CloseListener listener so when the user clicks in the close button of the window, the application is notified of that.

Embedded iframe = new Embedded(null, OpenWindowApplication.this.getStreamSource());
iframe.setType(Embedded.TYPE_BROWSER);
iframe.setWidth("100%");
iframe.setHeight("100%");
			
private void createSubWindow(String subWindowMessage, boolean modal, Embedded iframe) {

	final Window tempSubWindow = new Window(subWindowMessage);
	tempSubWindow.setWidth("80%");
	tempSubWindow.setHeight("80%");
	tempSubWindow.center();
	tempSubWindow.setModal(modal);

	tempSubWindow.addListener(new Window.CloseListener() {
		public void windowClose(CloseEvent e) {
			closeWindow();
		}
	});

	tempSubWindow.addComponent(iframe);

	OpenWindowApplication.this.subWindow = tempSubWindow;

	OpenWindowApplication.this.mainWindow.addWindow(OpenWindowApplication.this.subWindow);

}

private void closeWindow() {

	if (OpenWindowApplication.this.subWindow != null) {
		OpenWindowApplication.this.mainWindow.removeWindow(OpenWindowApplication.this.subWindow);
		OpenWindowApplication.this.subWindow = null;
		mainWindow.showNotification("Window closed by user");
	}

}

3
Image 3 – SubWindow opened after clicking the second Button

4
Image 4 – Modal subWindow opened after clicking the third Button

Posted in Java EE, Vaadin | Tagged , , , | Leave a comment

Create and Use Datasources in Apache Tomee 1.7.2 with H2 Database

I am creating a project using Apache Tomee as my development application server, because it is so fast to init and to deploy applications.

But I found that it is more strict than WebLogic, specially for defining and using resources like Queues and Datasources.

In this example, I will modify the H2 Datasource project that I created for Weblogic, to define the Datasource in Tomee.

Initially, I thought that I only had to define the datasource in the tomee configuration file WEB-INF/resources.xml, and the same code used to get the datasource would work without modification, but it didn’t happen that way.

I will show the steps that I took, the exceptions that I got and how to solve them, step by step.

1) According to the documentation, created the tomee configuration file in WEB-INF/resources.xml:

<?xml version="1.0" encoding="UTF-8"?>
<resources>
	<Resource id="datasource.h2" type="javax.sql.DataSource">
		JdbcDriver org.h2.Driver
		JdbcUrl jdbc:h2:tcp://localhost/C:\\andrei\\softwares\\h2-1.4.187\\dbs\\testapp
		UserName sa
		Password sa
		jtaManaged = true
		testOnBorrow = true
		validationQuery = SELECT 1 FROM DUAL
	</Resource>
</resources>

As you can see, my h2 database was created in C:\andrei\softwares\h2-1.4.187\dbs\testapp:

1

2) Start H2 database and connect to the database:

2

DB is up and running:

3

3) Compile the project:

mvn clean install -DskipTests

4

4) Start Tomee Server (Run tomee-installation/bin/startup.bat/sh):

5

5) Deploy it in the server (I used tomee-maven-plugin):

mvn tomee:deploy

6

It will fail. Let’s check the logs:

The exception will be a lot bigger, but this is the interesting part:

Caused by: java.lang.ClassNotFoundException: org.h2.Driver
at org.apache.catalina.loader.WebappClassLoader.loadClass(WebappClassLoader.java:1720)
at org.apache.tomee.catalina.LazyStopWebappClassLoader.loadClass(LazyStopWebappClassLoader.java:171)
at org.apache.catalina.loader.WebappClassLoader.loadClass(WebappClassLoader.java:1571)
at java.lang.Class.forName0(Native Method)
at java.lang.Class.forName(Class.java:270)
at org.apache.xbean.propertyeditor.ClassEditor.toObjectImpl(ClassEditor.java:40)
... 78 more

It means that the server could not find the h2 driver. Ok, now let’s copy h2*.jar to tomee-installation/lib:

7

Now let’s start and deploy the application to the server. This time the application will be deployed successfully. Let’s access the application.

The application started but it throws an exception when we access it:

8

The exception is:

javax.naming.NameNotFoundException: Name [datasource.h2] is not bound in this Context. Unable to find [datasource.h2]. at org.apache.naming.NamingContext.lookup(NamingContext.java:819) at

The datasource was not created. Now I will show you how to change the project data to resolve the errors.

According to the documentation, we have to make two changes in the project:

1) Change the jndi lookup code.

In the Weblogic project, we did the lookup by the jndi name, without any prefix.

For Tomee, we have to add the prefix “java:comp/env/” to the datasource name when we do the jndi lookup:

Context context = new InitialContext();

Context envContext = (Context) context.lookup("java:comp/env/");

DataSource dataSource = (DataSource) envContext.lookup(dataSourceJNDI);

2) Add the datasource resource reference in web.xml:

Add the following configuration to the web.xml:

<resource-ref>
    <description>H2 datasource</description>
    <res-ref-name>datasource.h2</res-ref-name>
    <res-type>javax.sql.DataSource</res-type>
    <res-auth>Container</res-auth>
</resource-ref>

Now let’s compile and deploy again in our server, it will work:

9

Comparing to the Weblogic configuration, I think that Tomme added complexity to the configuration, because if we have change the datasource name, we must change it also in the web.xml.

The modified project is also in github.

Posted in Java EE | Tagged , , , | Leave a comment

SELECT ALL TABLES WITH RECORDS IN AN ORACLE DATABASE

Today I want to share a quick tip that helped me in a current use case.

I was working with some integration tests with DBUnit, and the schema of my database was very big, with a lot of tables. I had to test a code that called some legacy code, and this code called another legacy code, anyway, I wanted to know all the tables that were modified in this test by this legacy code.

But in DBUnit, after the test we have to delete the records in the file, so there is no remaining data from the test that can interfere with other tests, generating side-effects, and I didn’t know the tables affected by the legacy code.

So I came up with this solution, before the test I deleted all the db records, and after the test I had to check all the tables that had records, so I can declare them in my DBUnit test to be deleted.

I think I found out a part of the query in stackoverflow, then modified to what I wanted, so here it is:

SELECT TABLE_NAME, TO_NUMBER(EXTRACTVALUE(XMLTYPE(DBMS_XMLGEN.GETXML('SELECT COUNT(*) C FROM ' || TABLE_NAME))
,'/ROWSET/ROW/C')) AS ROWS_COUNT
FROM ALL_TABLES
WHERE OWNER = '<YOUR DB USERNAME>'
ORDER BY 2 DESC;

The query result brought all the tables, with the ones that were modified appearing first, which was exactly what I needed.
So I modified my DBUnit data file to delete those tables, and I could test my code including the legacy code without the side effects of the remaining data in the database.

If you comment the WHERE clause, it will get all the data from all the tables in the database, including the system tables. In my use case, I didn’t need the data from those tables, just from my user’s tables.

PS: The query was tested on Oracle DB 11g (Oracle Database 11g Enterprise Edition Release 11.2.0.4.0 – 64bit Production).

Posted in Database, DBUNIT, Oracle | Tagged , , | Leave a comment

Installation, Configuration and Use of the Weblogic Maven Plugin for the Oracle Weblogic 12.1.3 Application Server

Recently I had to install this maven plugin and Oracle’s documentation was incorrect in my case.

Here are the steps I took to install this plugin:

1) [MANDATORY] Install Maven and configure the M2_HOME, PATH and JAVA_HOME, so that the java and mvn commands are present in the os’ path.

2) [MANDATORY] Install and configure Weblogic 12c (12.1.3)

According to the documentation, the next step is necessary, but it was not to me.

3) [OPTIONAL] Run ORACLE_HOME\wlserver\server\bin\setWLSEnv.[cmd/sh] command to configure your Weblogic with your local Maven environment.

When I ran it, it threw an error:

$ setWLSEnv.cmd

The WebLogic Server wasn’t found in directory \wlserver\server.
Please edit the setWLSEnv.cmd script so that the WL_HOME
variable points to the WebLogic installation directory.
Your environment has not been set.

This happenned because I had not set the weblogic environment variables.

In a default installation, you should set the MW_HOME env variable to where you installed the weblogic, in my case, C:\andrei\softwares\wls12130.
And the WL_HOME environment to where the wlserver is installed, again in my case it’s %MW_HOME%\wlserver.

After setting the variables, I executed the setWLSEnv.cmd file and it was OK:

Your environment has been set.

I put this step optional because before writing this blog post I managed to install the maven plugin without executing this step.

4) [MANDATORY] Change directory to ORACLE_HOME\oracle_common\plugins\maven\com\oracle\maven\oracle-maven-sync\12.1.3

5) [MANDATORY] Execute the command mvn install:install-file -DpomFile=oracle-maven-sync-12.1.3.pom -Dfile=oracle-maven-sync-12.1.3.jar

Depending on the command prompt you are using, it may not work. Per example, I tried  with Windows Power Shell and it didn’t work, and for cmd.exe it worked.
Maybe the reason that it didn’t work with the Windows Power Shell is because I did not ran the setWLSEnv.cmd command before also, I don’t know.
Anyway, in case it does not work, you can run the command a little differently, by passing the complete path of each file, so in my case it would be:

mvn install:install-file -DpomFile=%MW_HOME%\oracle_common\plugins\maven\com\oracle\maven\oracle-maven-sync\12.1.3\oracle-maven-sync-12.1.3.pom -Dfile=%MW_HOME%\oracle_common\plugins\maven\com\oracle\maven\oracle-maven-sync\12.1.3\oracle-maven-sync-12.1.3.jar

If it worked, you should see the jar copied to your maven local repository, under \com\oracle\maven\oracle-maven-sync\12.1.3-0-0\:

1

6) [MANDATORY] Execute the command mvn com.oracle.maven:oracle-maven-sync:push -Doracle-maven-sync.oracleHome=c:\oracle\middleware\oracle_home\.

I ran this command and it threw an error. Obviously I changed the last parameter to point to my local environment, but it still failed:

mvn com.oracle.maven:oracle-maven-sync:push -Doracle-maven-sync.oracleHome=%MW_HOME%\oracle_home\
[INFO] Scanning for projects...
Downloading: https://repo.maven.apache.org/maven2/com/oracle/maven/oracle-maven-sync/maven-metadata.xml
[INFO]
[INFO] ------------------------------------------------------------------------
[INFO] Building Maven Stub Project (No POM) 1
[INFO] ------------------------------------------------------------------------
[INFO]
[INFO] --- oracle-maven-sync:12.1.3-0-0:push (default-cli) @ standalone-pom ---
[INFO] "oracle-maven-sync.oracleHome" has been deprecated, use "oracleHome"
[INFO] ------------------------------------------------------------------------
[INFO] BUILD FAILURE
[INFO] ------------------------------------------------------------------------
[INFO] Total time: 10.915 s
[INFO] Finished at: 2015-05-16T15:32:08+02:00
[INFO] Final Memory: 11M/153M
[INFO] ------------------------------------------------------------------------
[ERROR] Failed to execute goal com.oracle.maven:oracle-maven-sync:12.1.3-0-0:pus
h (default-cli) on project standalone-pom: Synchronization execution failed: Was
not able to find the MAVEN directory in this Oracle Home. "C:\andrei\softwares\
wls12130\oracle_home" -> [Help 1]
[ERROR]
[ERROR] To see the full stack trace of the errors, re-run Maven with the -e swit
ch.
[ERROR] Re-run Maven using the -X switch to enable full debug logging.
[ERROR]
[ERROR] For more information about the errors and possible solutions, please rea
d the following articles:
[ERROR] [Help 1] http://cwiki.apache.org/confluence/display/MAVEN/MojoExecutionE
xception

I think the reason it failed was because I didn’t have this folder structure \oracle_home\.
So it was looking for a maven structure inside that directory.
Also there is a warning that it says that the parameter name has been deprecated, to use just “oracleHome”.
So let’s try again with the parameter key = oracleHome and parameter value = %command being just %MW_HOME%,
where the maven structure is:

mvn com.oracle.maven:oracle-maven-sync:push -DoracleHome=%MW_HOME%


[INFO] IMPORTANT NOTE
[INFO] This operation may have added/updated archetypes in your repository.
[INFO] To update your archetype catalog, you should run:
[INFO] 'mvn archetype:crawl -Dcatalog=$HOME/.m2/archetype-catalog.xml'
[INFO]
[INFO] ------------------------------------------------------------------------
[INFO] BUILD SUCCESS
[INFO] ------------------------------------------------------------------------
[INFO] Total time: 9.516 s
[INFO] Finished at: 2015-05-16T15:44:51+02:00
[INFO] Final Memory: 12M/221M
[INFO] ------------------------------------------------------------------------

Also note an importante message, to update our archetype catalog, let’s run the command

mvn archetype:crawl -Dcatalog=%HOME%/.m2/archetype-catalog.xml

Probably this command will be ok, so now let’s validate the installation of the plugin by running the command below:

mvn help:describe -DgroupId=com.oracle.weblogic -DartifactId=weblogic-maven-plugin -Dversion=12.1.3-0-0

If it works, you will see the plugins goals in the end the buld success:

weblogic:wsgen
Description: Reads a JAX-WS service endpoint implementation class and
generates all of the portable artifacts for a JAX-WS web service.

weblogic:wsimport
Description: Parses wsdl and binding files and generates Java code needed
to access it.

For more information, run ‘mvn help:describe […] -Ddetail’

[INFO] ————————————————————————
[INFO] BUILD SUCCESS
[INFO] ————————————————————————
[INFO] Total time: 2.289 s
[INFO] Finished at: 2015-05-16T16:00:14+02:00
[INFO] Final Memory: 10M/153M
[INFO] ————————————————————————

The plugin has various usages, you can check all of them on Oracle’s documentation.

Now let’s test it with a real project. Let’s use the plugin to deploy a project to WLS using maven command-line.
For this testing, you can get this project that I created, and explained how to installed it in this post, and then edit it’s pom.xml file.
Add this new plugin in the plugins section, and fill in the data from your environment:

<plugin>
<groupId>com.oracle.weblogic</groupId>
<artifactId>weblogic-maven-plugin</artifactId>
<version>12.1.3-0-0</version>
<configuration>
<name>${project.build.finalName}</name>
<source>${project.build.directory}/${project.build.finalName}.${project.packaging</source>
<verbose>true</verbose>

<!–  Edit the data below accordingt to your environment –>
<adminurl></adminurl>
<user></user>
<password></password>
<targets></targets>
</configuration>
</plugin>

Fill in the below data:
– Fill in the admin url to your weblogic installation, in my machine it’s t3://127.0.0.1:7001.
– Fill in your weblogic user.
– Fill in your password.
– Fill in your server name.

After this step is done, build the project and then run the command:

mvn com.oracle.weblogic:weblogic-maven-plugin:deploy

Output:

[INFO] Scanning for projects...
[INFO]
[INFO] ------------------------------------------------------------------------
[INFO] Building h2-weblogic12c-datasource-example 1.0
[INFO] ------------------------------------------------------------------------
[INFO]
Task 0 initiated: [Deployer:149026]deploy application h2-weblogic12c-datasource-
example on myserver.
Task 0 completed: [Deployer:149026]deploy application h2-weblogic12c-datasource-
example on myserver.
Target state: deploy completed on Server myserver
Target Assignments:
+ h2-weblogic12c-datasource-example  myserver
[INFO] ------------------------------------------------------------------------
[INFO] BUILD SUCCESS
[INFO] ------------------------------------------------------------------------
[INFO] Total time: 38.005 s
[INFO] Finished at: 2015-05-16T17:28:21+02:00
[INFO] Final Memory: 13M/221M
[INFO] ------------------------------------------------------------------------

Then check in your weblogic console, it will be deployed:

2

Posted in Java EE, maven, weblogic | Tagged , , , , | Leave a comment

Installation and Use of H2 Database in a Connection Pool on Oracle Weblogic 12c Application Server

In this blog post, I will create a simple proof-of-concept application showing the use of H2 database in a connection pool on  Oracle Weblogic 12c.

I searched on Internet and I didn’t find a complete example, so I decided to write a blog post and a github example.

My local environment is a Windows 7 machine with Weblogic 12c (12.1.2), and for the H2 database, I use the latest version (1.4.187).

First, I will show the installation of H2 db in a Windows machine.

 Installation of the H2 Database:

 1) Download H2 database from

http://www.h2database.com/html/download.html

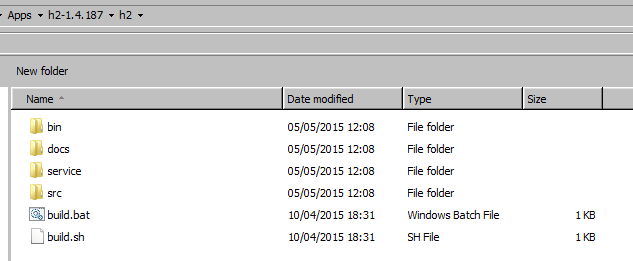
2) If you have downloaded the windows service application, execute it. If you have downloaded the .zip file, extract it into a folder:

1

3) To open the database application, go to the installation directory/bin folder and execute the h2.bat/sh file. It will open a web page:

2

4) Configure the type of server you want to create, the location and the username / password.

5) Test the connection to check if everything worked. If it did, a *.mv.db file will be created in the directory you specified in the JDBC URL. If you click on connect, you will be redirected to another application, to manage your database:

 3

Configuration of Weblogic:

 Now that H2 database is installed, we need to configure it in Weblogic.

 The first step is to add the H2 jar file to the weblogic classpath.

 According to the documentation, we can do it in two different ways:

 1) For only one domain.

2) For all the domains.

 In this blog post, I will configure it only for one domain:

 1) Copy the file h2-installation/bin/h2-1.4.187.jar to weblogic-domain/lib.

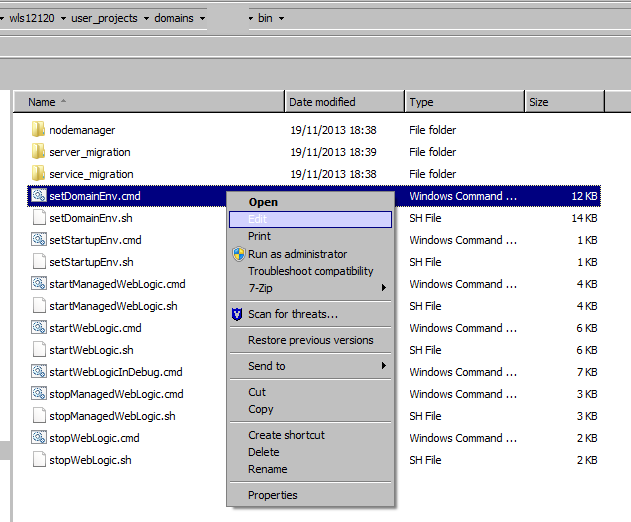
2) Edit the weblogic-domain/bin/setDomainEnv.bat/sh script. As I am using Windows, I will edit the .bat file:

4

3) Add an entry in the PRE_CLASSPATH variable for H2 jar, the simpler way to do that is to include a new line below the last time the variable was set. This way you are just adding a new value to the existing variable value:

set PRE_CLASSPATH=%DOMAIN_HOME%\lib\h2-1.4.187.jar;%PRE_CLASSPATH%

4) Restart the server and check the output. In my server, it outputted the library right after starting, which means that the jar is in the server classpath.

WLS Start Mode=Development

CLASSPATH=C:\PGM\R3-DEV\wls12120\USER_P~1\domains\…\lib\h2-1.4.187.jar;

Creation of the H2 DataSource in Weblogic

 Now we are going to create the H2 datasource in Weblogic. Login to Admin Console and go to

Domain Structure Menu -> Services -> Data Sources.

When the page loads, click New button -> Generic Data Source

5

In the next screen, select the name and JDNI name of your data source, select Database Type: Other, and click the Next button:

 6

In the next page, just click Next button:

 7

In the next page, make sure you select the select the Supports Global Transactions checkbox, and also select the Emulate Two-Phase Commit radio button, and click the Next button:

 8

In the next page, fill out the fields like below:

Driver Class Name: org.h2.Driver

URL: jdbc:h2:tcp://localhost/C:\db-path (local path of your database installation).

Database User Name: Your db user name (in my case, the dafault sa).

Password: your password (in my case, sa).

Confirm Password: your password again (in my case, sa).

Properties: In this properties text area, add the two parameters below, according to your configuration:

user=sa

password=sa

System Properties: You may leave it blank.

Test Table Name: Not really necessary, but I put just “DUAL”, without the quotes.

You may want to click the Test Configuration button, to make sure that everything is ok.

 Then click Next button.

9

In the next page, select your server and click Finish Button.

10

Now your data source should appear in the Data Sources page:

11

 To test this, I created a very simple application, nothing fancy, using servlets and JSP to show the result.

 The application only has one servlet, mapped to the / context root, when you access it, it tries to get the H2 datasource from Weblogic using two ways, both work.

The first way is using an empty InitialContext, and the second is creating the InitialContext with some weblogic parameters:

 First way:

Context context = new InitialContext();

Second way:

Hashtable<String, String> contextProperties = new Hashtable<String, String>();
contextProperties.put(Context.INITIAL_CONTEXT_FACTORY, PropertiesUtils.getWeblogicContextFactory());
contextProperties.put(Context.PROVIDER_URL, PropertiesUtils.getWeblogicContextProviderUrl());
Context context = new InitialContext(contextProperties);

I externalized the datasource name in a properties file that you can change if you want.

 After getting the datasource, it queries it for all the db schemas created, and writes them on a html table.

 Also in the UI there is an exception field, so if anything goes wrong, you can know what happened.

 12

Posted in Uncategorized | Tagged , | 3 Comments

Windows did not update the Java program location when I updated JAVA_HOME environment variable to other JVM – Solution

In my work PC, I have JDK8 installed and set in the JAVA_HOME environment variable.
But for another project, I had to install JDK6.
So I did it and updated JAVA_HOME environment variable.

But then I got an error: when I ran the javac program, it ran the program from the JDK6 installation, but the javac program executed the binary from the JDK8 installation.

PS C:\Users\adm> javac -version
javac 1.6.0_29

PS C:\Users\adm> java -version
java version "1.8.0_05"
Java(TM) SE Runtime Environment (build 1.8.0_05-b13)
Java HotSpot(TM) 64-Bit Server VM (build 25.5-b02, mixed mode)
PS C:\Users\adm>

I found out that when you install Oracle Java in Windows, it copies some of the softwares in JAVA_HOME\bin folder (java.exe, javaw.exe and javaws.exe) to Windows\System32 directory.
So I just deleted the files from the System32 Windows folder and it fixed this bug.

PS C:\Users\adm> javac -version
javac 1.6.0_29
PS C:\Users\adm> java -version
java version "1.6.0_29"
Java(TM) SE Runtime Environment (build 1.6.0_29-b11)
Java HotSpot(TM) Client VM (build 20.4-b02, mixed mode)
PS C:\Users\adm>
Posted in JDK, Uncategorized, Windows | Tagged , | Leave a comment

Maven 3 Cannot download dependencies behind a proxy – Temporary Solution

In the company I work, we are behind a proxy, and every time we connect to addresses outside the company’s network we have to use the proxy.

Our proxy demands a domain, so to fill my user account data to proxy, I have to use domain\username.

I configured maven to use the proxy in ~/.m2/settings.xml configuration file:

<settings xmlns="http://maven.apache.org/SETTINGS/1.0.0"
  xmlns:xsi="http://www.w3.org/2001/XMLSchema-instance"
  xsi:schemaLocation="http://maven.apache.org/SETTINGS/1.0.0
                      http://maven.apache.org/xsd/settings-1.0.0.xsd">
	<proxies>
		<proxy>
			<id>proxy</id>
			<active>true</active>
			<protocol>http</protocol>
			<username>domain\username</username>
			<password>password</password>
			<host>10.10.5.1</host>
			<port>80</port>
			<nonProxyHosts>localhost|127.0.0.1</nonProxyHosts>
		</proxy>
	</proxies>

</settings>

I am using maven 3 for project and dependencies management, but I could not make it work with my proxy.
I tried several solutions I found on Internet but none worked.

It appears that in Maven 3.0.4 version, they changed the http library, but it still have some bugs.

Then in some page I found out that maven 2 works with this kind of proxy because it uses a different library, HttpClient wagon.

So I decided to test it, first I downloaded maven 2.2.1, from maven download site.

Then I extracted the zip to a local folder and I only had to change the MAVEN_HOME environment variable to point to the maven 2 installation directory, instead of the maven 3.

Then I built my project using maven and it downloaded all the dependencies.

If you want to keep using maven 3, after the dependencies download update the MAVEN_HOME environment variable again to point to the maven 3 installation directory.

UPDATE: I was checking a project (arquillian-container-wls) and it demanded the use of at least maven version 3.0.3 to build the project. So instead of maven 2, I downloaded maven 3.0.3, which it’s a version before the http library change, and it worked. Now I am only using maven 3.0.3.

Posted in maven, Uncategorized | Tagged , | Leave a comment

Oracle 11g – Copy data from one table to another table

In this post I will show a little trick that is very useful in some situations, like if your table structure changes all the time and you have some data already stored in the table.

We will create a backup table to store the data that already exist, and when we finish the database refactor we will re-import the data from the backup to the original table.

I had a hard time to find out how to do it using Oracle DB, most of the posts about this were about MySQL or SqlServer.

So let’s go to the use case. Suppose we have a USER table:

CREATE TABLE USER (
	USER_ID					NUMBER NOT NULL,
	NAME					VARCHAR(100)
	CONSTRAINT USER_PK PRIMARY KEY (USER_ID)
)

If the backup table does not exist, the code will not work, so we have to create the backup table before we run the command:

CREATE TABLE USER_BACKUP (
	USER_B_ID					NUMBER NOT NULL,
	NAME						VARCHAR(100)
	CONSTRAINT USER_B_PK PRIMARY KEY (USER_B_ID)
)

To insert all data from user table in the user_backup table, we run the command:

INSERT INTO USER_BACKUP(
USER_B_ID,
NAME)
SELECT USER_ID,
NAME
FROM USER

I tested it in my development database, Oracle 11g, and it worked:

SELECT * FROM V$VERSION

Oracle Database 11g Enterprise Edition Release 11.1.0.7.0 – 64bit Production
PL/SQL Release 11.1.0.7.0 – Production
“CORE 11.1.0.7.0 Production”
TNS for Linux: Version 11.1.0.7.0 – Production
NLSRTL Version 11.1.0.7.0 – Production

Posted in Database, Oracle | Tagged , , , | Leave a comment

JEE 6 – Asynchronous methods calls example

I’m studying for the Oracle Certified Expert – Enterprise JavaBeans Developer 6 Certification exam using Enthuware’s exam simulator.

I decided to create examples of the questions that I had doubts.

There was a question on a test that I answered incorrectly, about asynchronous method calls in EJB applications.

I will not publish the wording of the question in respect to Enthuware’s product (by the way, I think it’s a great tool, it helps me a lot to practice for the certification exams), but I can describe the general meaning of the question:

The question presented a session bean class with two methods, one method annotated with @Asynchronous annotation, and another regular method.

The regular method called the async method. Then you had to analyze the code and answer some questions about it.

As I said, I answered it incorrectly. Enthuware provides a forum so we can post our questions. So I created a new post on their forum and they promptly answered me. It was a trick question, so I decided to create a similar example and post it on github. One example is using the correct asynchronous method call and the other example is developed following the trick question, where the method code seems to be asynchronous but the runtime invocation would be synchronously.

The context is the same for both projects.

We have the AsyncCalculator interface, it’s a local business interface. It has the Future<Double> calc() method:

@Local
public interface AsyncCalculator {

    public Future<Double> calc();

}

We also have a Stateless session bean implementing this interface, AsyncCalculatorBean class:

@Stateless(name="asyncCalculator")
public class AsyncCalculatorBean implements AsyncCalculator {

Then we have a Singleton session bean annotated with @Startup, so when the EJB container starts the application, it will automatically create and load this bean:

@Singleton
@Startup
public class Main {

    private Logger LOGGER;

    @EJB(name="asyncCalculator")
    private AsyncCalculator asyncCalculatorBean;

    @PostConstruct
    public void start() {

This bean has a  start() method and it will be called after the creation of this bean, because it’s annotated with @PostConstruct annotation. Inside this method we call the Future<Double> calc() method and the get() method in the returned Future object.

Future<Double> asyncCalcResult = asyncCalculatorBean.calc();
...
calcResult = asyncCalcResult.get();

Now let’s see each example.

ejb31-async-method-in-other-object-example:

In this example, AsyncCalculatorBean class implements an async method. Future<Double> calc() method is annotated with the @Asynchronous annotation, and the call will be an async call. If we run the code in the server, we get the log lines below:

16:31:59,388 DEBUG [Main ] Calling Async method on AsyncCalculator bean.
16:31:59,390 DEBUG [Main ] Async method on AsyncCalculator bean returned. Now Future.get() method will be called on the Future object.
16:31:59,401 DEBUG [AsyncCalculatorBean ] Starting async method.
16:32:09,404 DEBUG [AsyncCalculatorBean ] Finished async method.
16:32:09,405 DEBUG [Main ] Finished calling Future.get() method on future object, and the result is 2.001.

The first log line is written before the async method call to the AsyncCalculatorBean class, in the Main class.
The second log line is written after the async method call, in the Main class.
Look at the time difference, it’s right after the business method call. It means that the async call returned the control to this thread right after the method call. The async method continues running in another thread until it finishes.

When the code in Main class calls the Future.get() method, then this thread will be suspended until async thread finishes.

This behavior is exemplified in the third and fourth log lines, that is the execution async call in the AsyncCalculatorBean class.
After the async method completes, the ccontrol returns to the Main class, returning and printing the AsyncResult<Double> object, as seen in the fifth log line.

ejb31-async-method-in-same-object-example:

In this second example, AsyncCalculatorBean class implements Future<Double> calc() method, but it’s not an async method. This method calls another method in the same bean class, called Future<Double> asyncCalc(), and this is the method annotated with the@Asynchronous annotation. This method is not a business method. The method execution will not be asynchronous.
If we run the code in the server, we get the log lines below:

18:52:44,282 DEBUG [Main ] Calling Async method on AsyncCalculator bean.
18:52:44,288 DEBUG [AsyncCalculatorBean ] Starting async method.
18:52:54,291 DEBUG [AsyncCalculatorBean ] Finished async method.
18:52:54,291 DEBUG [Main ] Async method on AsyncCalculator bean returned. Now Future.get() method will be called on the Future object.
18:52:54,291 DEBUG [Main ] Finished calling Future.get() method on future object, and the result is 2.001.

The first log line is written before the async method call to the AsyncCalculatorBean class, in the Main class.
The second and third log lines are written by the AsyncCalculatorBean class. There is a difference of 10 seconds between the method call, which is the time the method took to complete. This means that the method executed synchronously, in the same thread.
Then the fourth and fifth lines are from the Main class again, when the execution goes back to the Main class. The Future.get() method executes instantly.

I searched the EJB 3.1 documentation and I think I found an explanation about it in the section:

4.5.2.2 Bean Classes
Note that the Future object returned from the bean class method (including any instance of AsyncResult) is only used as a way to pass the result value to the container. This object is not given directly to the caller, since by definition the caller already has a container-generated Future object that was returned from the original EJB reference invocation.

My understanding is that the container controls the execution of the session bean that contains the asynchronous object, and when a client a client calls an async method an gets a Future<V> reference of some object, this reference is managed by the container and it’s not the same object that the bean provider returns in the execution of the async method, but a proxy object created by the container. In the end they will be the same object, when the async method call will complete and the container will return the result of the async method call to the client.
To conclude, the async method call only works when the async method is a business method, specified in the Local, Remote or no-interface of the bean. Also the called of this method must get the reference of this bean using Dependendy injection or a JNDI lookup, so the asynchronous will be managed by the container.


PS: I want to thank Micha Kops for this blog post, it helped me a lot to create my example running on Junit tests using an embedded Glassfish server.

Posted in EJB, Java, Java Certification, Java EE | Tagged , , , , , | Leave a comment